Omaha Air Bombardment - Part I: Planning a Tactical Mission for Strategic Bombers
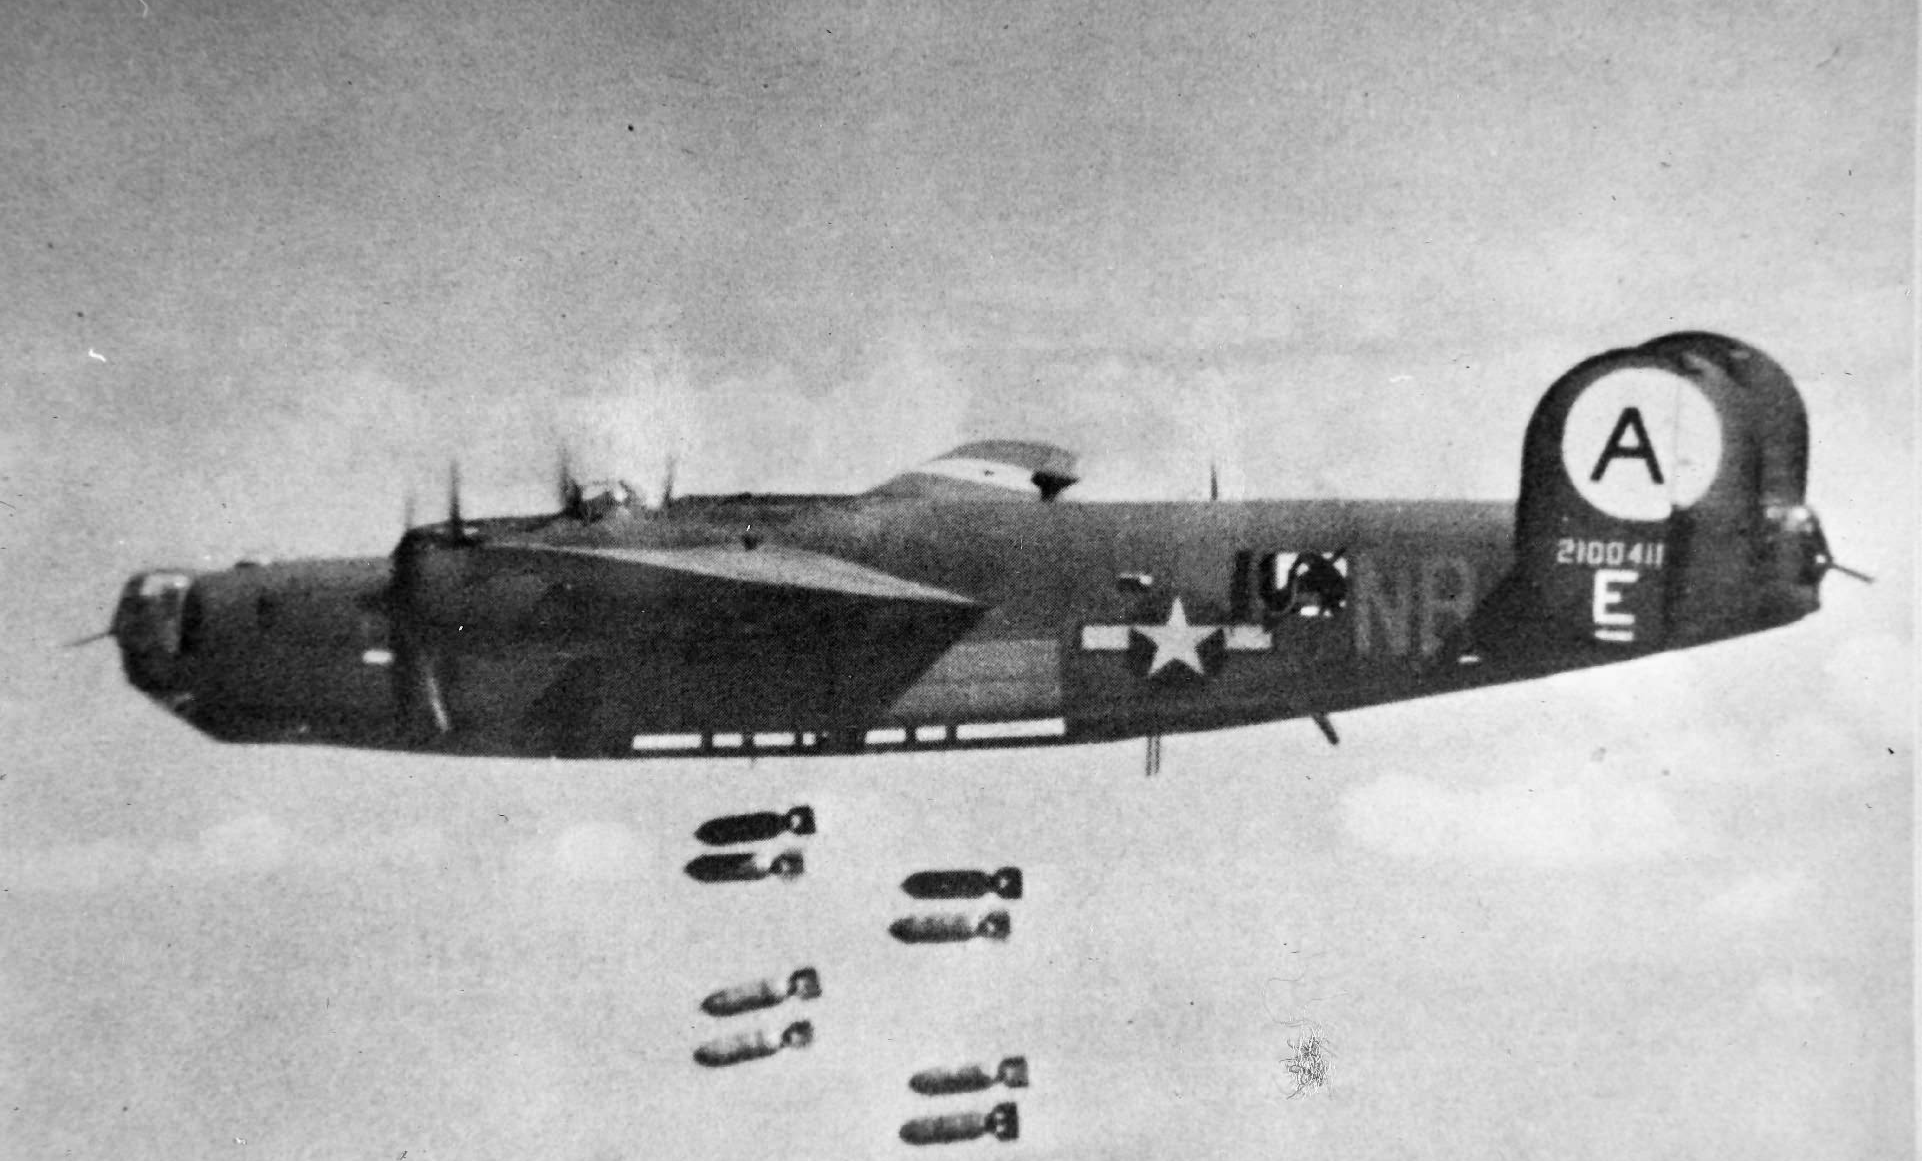
A B-24 Bomber belonging to the 44th Bomb Group. 2nd Bombardment Division.
In the preceding three installments, we traced Rear Admiral Hall’s approach to the pre-invasion naval bombardment in the Omaha Assault Area. For months he had protested the lack of bombardment ships he’d been given, and protested the lack of time in which to conduct the bombardment. He also protested being forced to employ an ad hoc flotilla of makeshift bombardment craft. But on D-Day, his task force left almost half its allotted bombardment ammunition unfired, sparing the defenders much of the punishment that had been counted on by the ground forces. After the invasion, Hall attempted to recast the reality, claiming his bombardment was effective, and the failure to neutralize the defenses was due to the failure of the air bombardment to hit its targets.
“Naval gunfire support was effective against the targets on which it was directed. Unfortunately the pre-landing bombardment was not accompanied by air bombardment as was planned, consequently many enemy position were left untouched.”[1]
This excuse was transparently false, as every single air target coincided with one or more naval bombardment targets (Figure 2). If an enemy position was ‘left untouched’, then it wasn’t just a matter of the air bombardment failing to hit it, it would have to mean Hall’s naval bombardment also failed to hit it. Yet one thing Hall’s bombardment did manage to do was strike every assigned target, though with far less ordnance than called for. The simple fact is that Hall’s bombardment was only partly effective, and that was due to the fact that it was only partly executed. His attempt to shift the blame to the air service was merely an attempt to distract from his own failure.
Hall’s comment does, however, represent the general belief that the air bombardment posed a powerful punch, one that surely must have obliterated the Omaha defenses . . . if only it had hit its targets. While there is truth to that idea, it is also something of an exaggeration and reveals a lack of understanding of the nature and limits of strategic bombers when used in tactical support.
This article examines the planned aerial targeting of the Omaha defenses; analyzes how the air bombardment plan might have translated into actual bombs-on-target; and provides some realistic appreciation for the neutralization effects that might have been expected. The next installment will investigate how the last-minute decision to delay the bomb releases points came about and whether that decision had any practical effect in negating the accuracy of the air bombardment mission.
The Air Bombardment Plan
The Neptune air plan was initially published on 15 April 1944 by the Allied Expeditionary Air Force headquarters (Air Marshall Leigh-Mallory, commanding). It was an amazingly complex plan covering a bewildering variety of objectives and missions. The effort to produce this plan had seen a great deal of wrangling over control the heavy bombers which had been conducting the Combined Bomber Offensive. Even after the Combined Chiefs of Staff finally put an end to that issue and assigned them to General Eisenhower for the preparation and conduct of the invasion, debate continued. The focus of contention then shifted to how best to employ strategic bombers for tactical purposes, and the many alternative proposals saw just as many serious disagreements.
A full discussion of these alternatives—ranging from the campaign against German radar sites to the campaign against the transportation network—would take far too much space. Our focus here is limited to the portions of that plan that directly supported the landing force at Omaha. This consisted of three phases. The first phase entailed the air strikes on the morning of 6 June against selected German coastal artillery positions, which I will touch on only briefly. The second phase entailed the bomber strikes against the German beach defenses, which is the primary focus of this analysis. The third phase involved the tactical air strikes which began after H-Hour, but we’ll omit it as it lies outside the scope of this topic.
Phase I – Coastal Defense Battery Suppression
The first phase of the Omaha air bombardment actually would be the culmination of a weeks-long effort against coastal artillery positions. Both studies and bombing experience had shown that the chances of actually knocking out a gun in a concrete casement were very remote, so much of the effort had been redirected against batteries where casemates had not been completed, such as Pointe du Hoc. The objective was to delay construction, and possibly knock out an unprotected gun or two as well. The air strikes early on 6 June, however, would include selected batteries that were hardened as well unprotected sites, with the objective being the now familiar neutralization. Those early morning operations would involve a series of six strikes. The first two air strikes would come in the pre-dawn hours of 6 June, striking the 155mm coastal artillery guns at Pointe du Hoc [2] and at the Maisy I battery. The RAF Bomber Command flew these missions, with bombing taking place between H-7 Hours and H-44 minutes. Pointe du Hoc was targeted by 124 bombers carrying 698 tons of bombs, and Maisy I by 116 bombers carrying 592 tons. [3]
The next strikes in this phase consisted of fighter bombers from the US Ninth Tactical Air Force. These are sometimes incorrectly listed as again striking Maisy and Pointe du Hoc. They actually targeted a 75mm gun battery in the Maisy II position and an unidentified field artillery battery at Gefosse. [4] Each position was targeted by a squadron of 18 aircraft. Maisy was hit by all 18 aircraft delivering 27 tons (with “good” results). Gefosse was actually hit by only 13 aircraft delivering 20 tons (with “excellent” results). [5] These strikes took place between H-40 (0550 hours) and H+08 (0638 hours).
The fifth and sixth strikes were tasked to the medium bombers of the Ninth Tactical Air Force. These would revisit the 155mm coastal artillery batteries at Pointe du Hoc and the Maisy I positions. Eighteen medium bombers were targeted for each of these positions, and the strikes were due to go in between H-30 to H-5. [6] Each of these 36 aircraft was carrying approximately 4,000 pounds of bombs. The strikes were late, actually hitting between H-5 and H+15 (0625 hours and 0645 hours). Since the Ranger assault at the Pointe was scheduled to land at 0630 hours, this late strike could have resulted in a friendly-fire disaster. As it was, the Ranger landing craft were themselves about 40 minutes late in arriving, resulting in a different form of disaster: the interval between bombs and assault permitted the defenders time to recover. The bombing results at Pointe du Hoc were reported as “unobserved” due to the weather, and at Maisy I as “well covered by the bursts of the 1,000- and 2,000-pound bombs.”
The Maisy complex and Gefosse position (both covering the Utah beaches, although themselves located in the Omaha Assault Area) were largely neutralized and ineffective on D-Day, though the Maisy complex would prove troublesome in the following days. The battery at Pointe du Hoc, under frequent bombing attacks, had withdrawn the guns to a position inland, where it was subsequently located and destroyed by the Rangers.
Despite the uneven results of these attacks, the various air components prevented the major coastal artillery position from interfering with the landings. Points to the flyboys, and well done.
Phase II – Beach Defense Neutralization
The second portion of the bombardment plan consisted of a series of targets, most of which consisted of the resistance nests scattered along the landing beach sectors. Whereas the RAF and the US Ninth Air Force had conducted the strikes on the coastal artillery sites, the beach defense bombardment was tasked to newly-promoted Lieutenant General (LTG) James ‘Jimmy’ Doolittle’s Eighth Air Force, and he in turn tasked the Omaha portion to Major General (MG) James P. Hodge’s 2nd Bombardment Division. That division consisted of five combat bombardment wings , all of which were equipped with Consolidated B-24 Liberator heavy bombers. One of the wings was new, however, and was not used on the delicate Omaha mission.
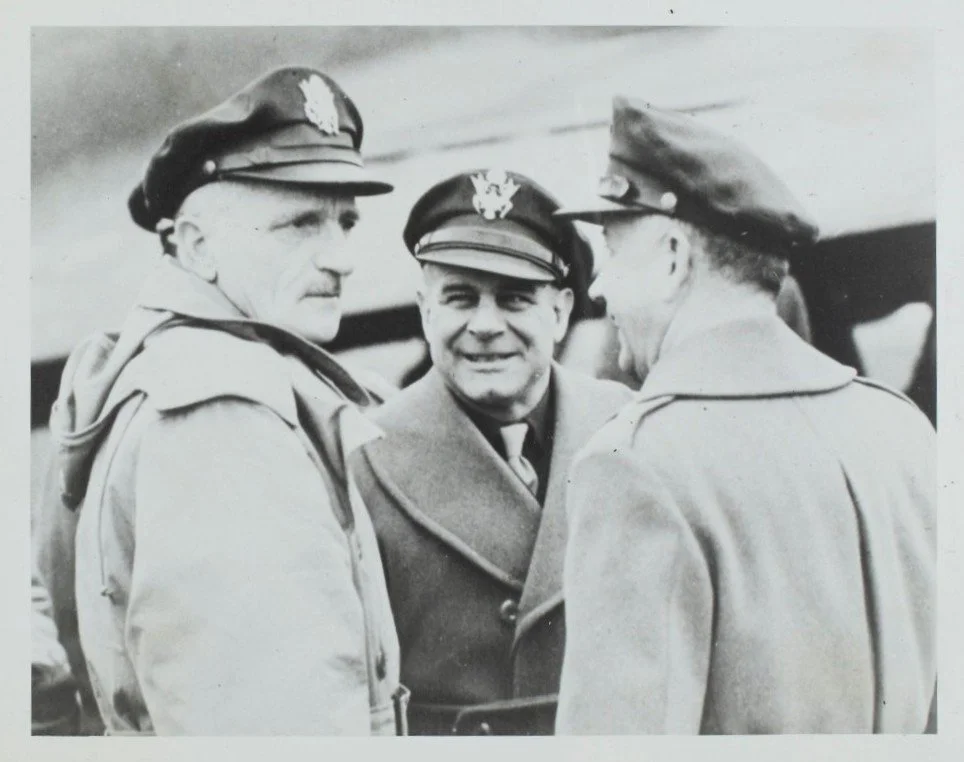
Figure 1. The Air Commanders (l to r): Lieutenant General Carl Spaatz (commanding the US Strategic Air Forces in Europe), Lieutenant General James Doolittle (commanding the US Eighth Air Force) and Major General James Hodges (commanding the 2nd Bombardment Division).
Target designations could be a bit confusing due to different systems used. For example the Germans identified their resistances nests with the letters WN combined with a number, such as WN73 (the position just west of the Vierville draw). The Army and Navy worked from a common list (the Vth Corps target list) which provided specific coordinates for gunfire targets throughout the beachhead. They also supposedly had a common list of requested air targets, which they identified by letters only. The air command took the requested Army/Navy targets and drew lines roughly encompassing the boundaries of individual or multiple resistance nests, labelled them with alpha-numerical designations and picked an aim point within the boundaries. Some USAAF aerial photos show yet another target designation system using just two digit numbers, and some mission reports refer to targets by a single letter designations—which do not match the letters used by the Army and Navy for air targets. It is perhaps no surprise that few studies of the Omaha air bombardment can agree on the targets. Figure 1 provides a partial crosswalk between the naming systems. For the sake of consistency in this project, I will simply reference the air targets using the corresponding resistance nest designations.
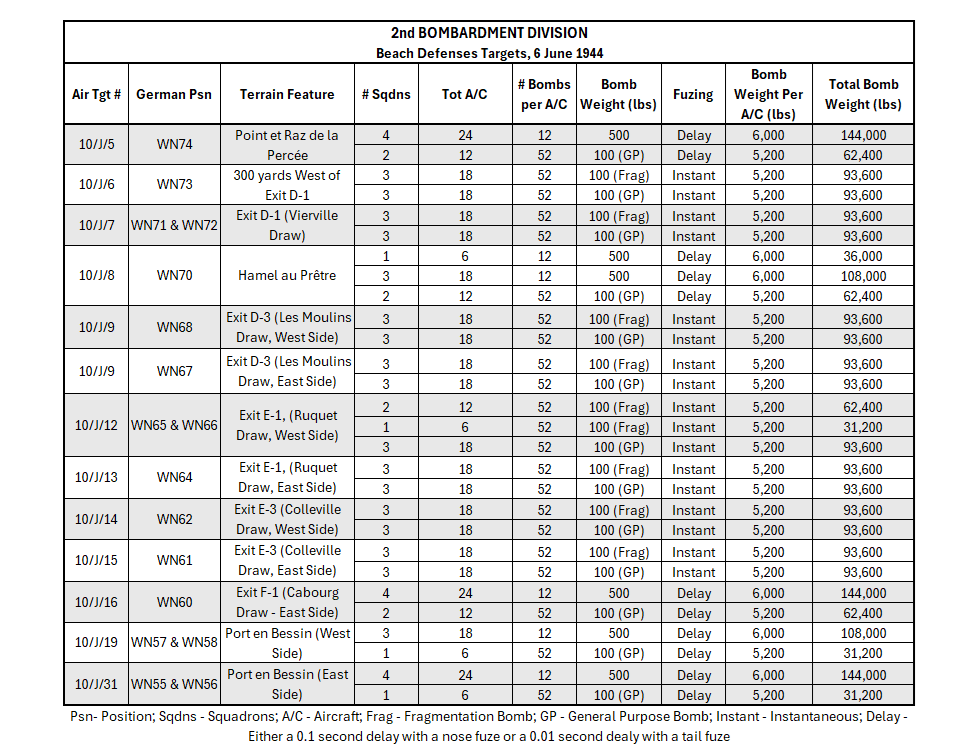
Figure 2. A crosswalk showing the some of the various terms for the same targets, as well as the numbers of squadrons, aircraft and bombloads allotted to those targets.
The Army requested 13 air targets for this phase, but the 2nd Bombardment Division identified only 12. There was no practical disconnect in this, as one air target (10/J/9) encompassed two Army targets, and the 2nd Bombardment Division planned two strikes there, effectively separately attacking both Army targets. Other than this, the Army and 2nd Bombardment Division lists generally agree, and for the purposes of this analysis I will refer to them as 13 targets. The Navy’s CTF 122 order, however, included the radar installations in WN74a (which was not on the Army/USAAF lists), and did not include the two targets at Port en Bessin (which were on the Army/USAAF lists). [7] The 2nd Bombardment Division list was, of course, the definitive document as far as execution was concerned. Eleven of these 13 strikes clearly focused on neutralizing the defenses of the actual landing sectors. The last two (at Port en Bessin) did not, and principally dealt with neutralizing some light guns (75mm) which could threaten the ships and craft off Omaha. Hall’s CTF-124 order identified seven of the thirteen targets as receiving two air strikes each. The Army orders did not mention this point, and neither did the 2nd Bombardment Division’s order (except for the one double target mentioned above). The 2nd Bombardment Division’s order evenly allocated six squadrons to each of the thirteen strikes, except for the two Port en Bessin targets which would only have four and five squadrons.
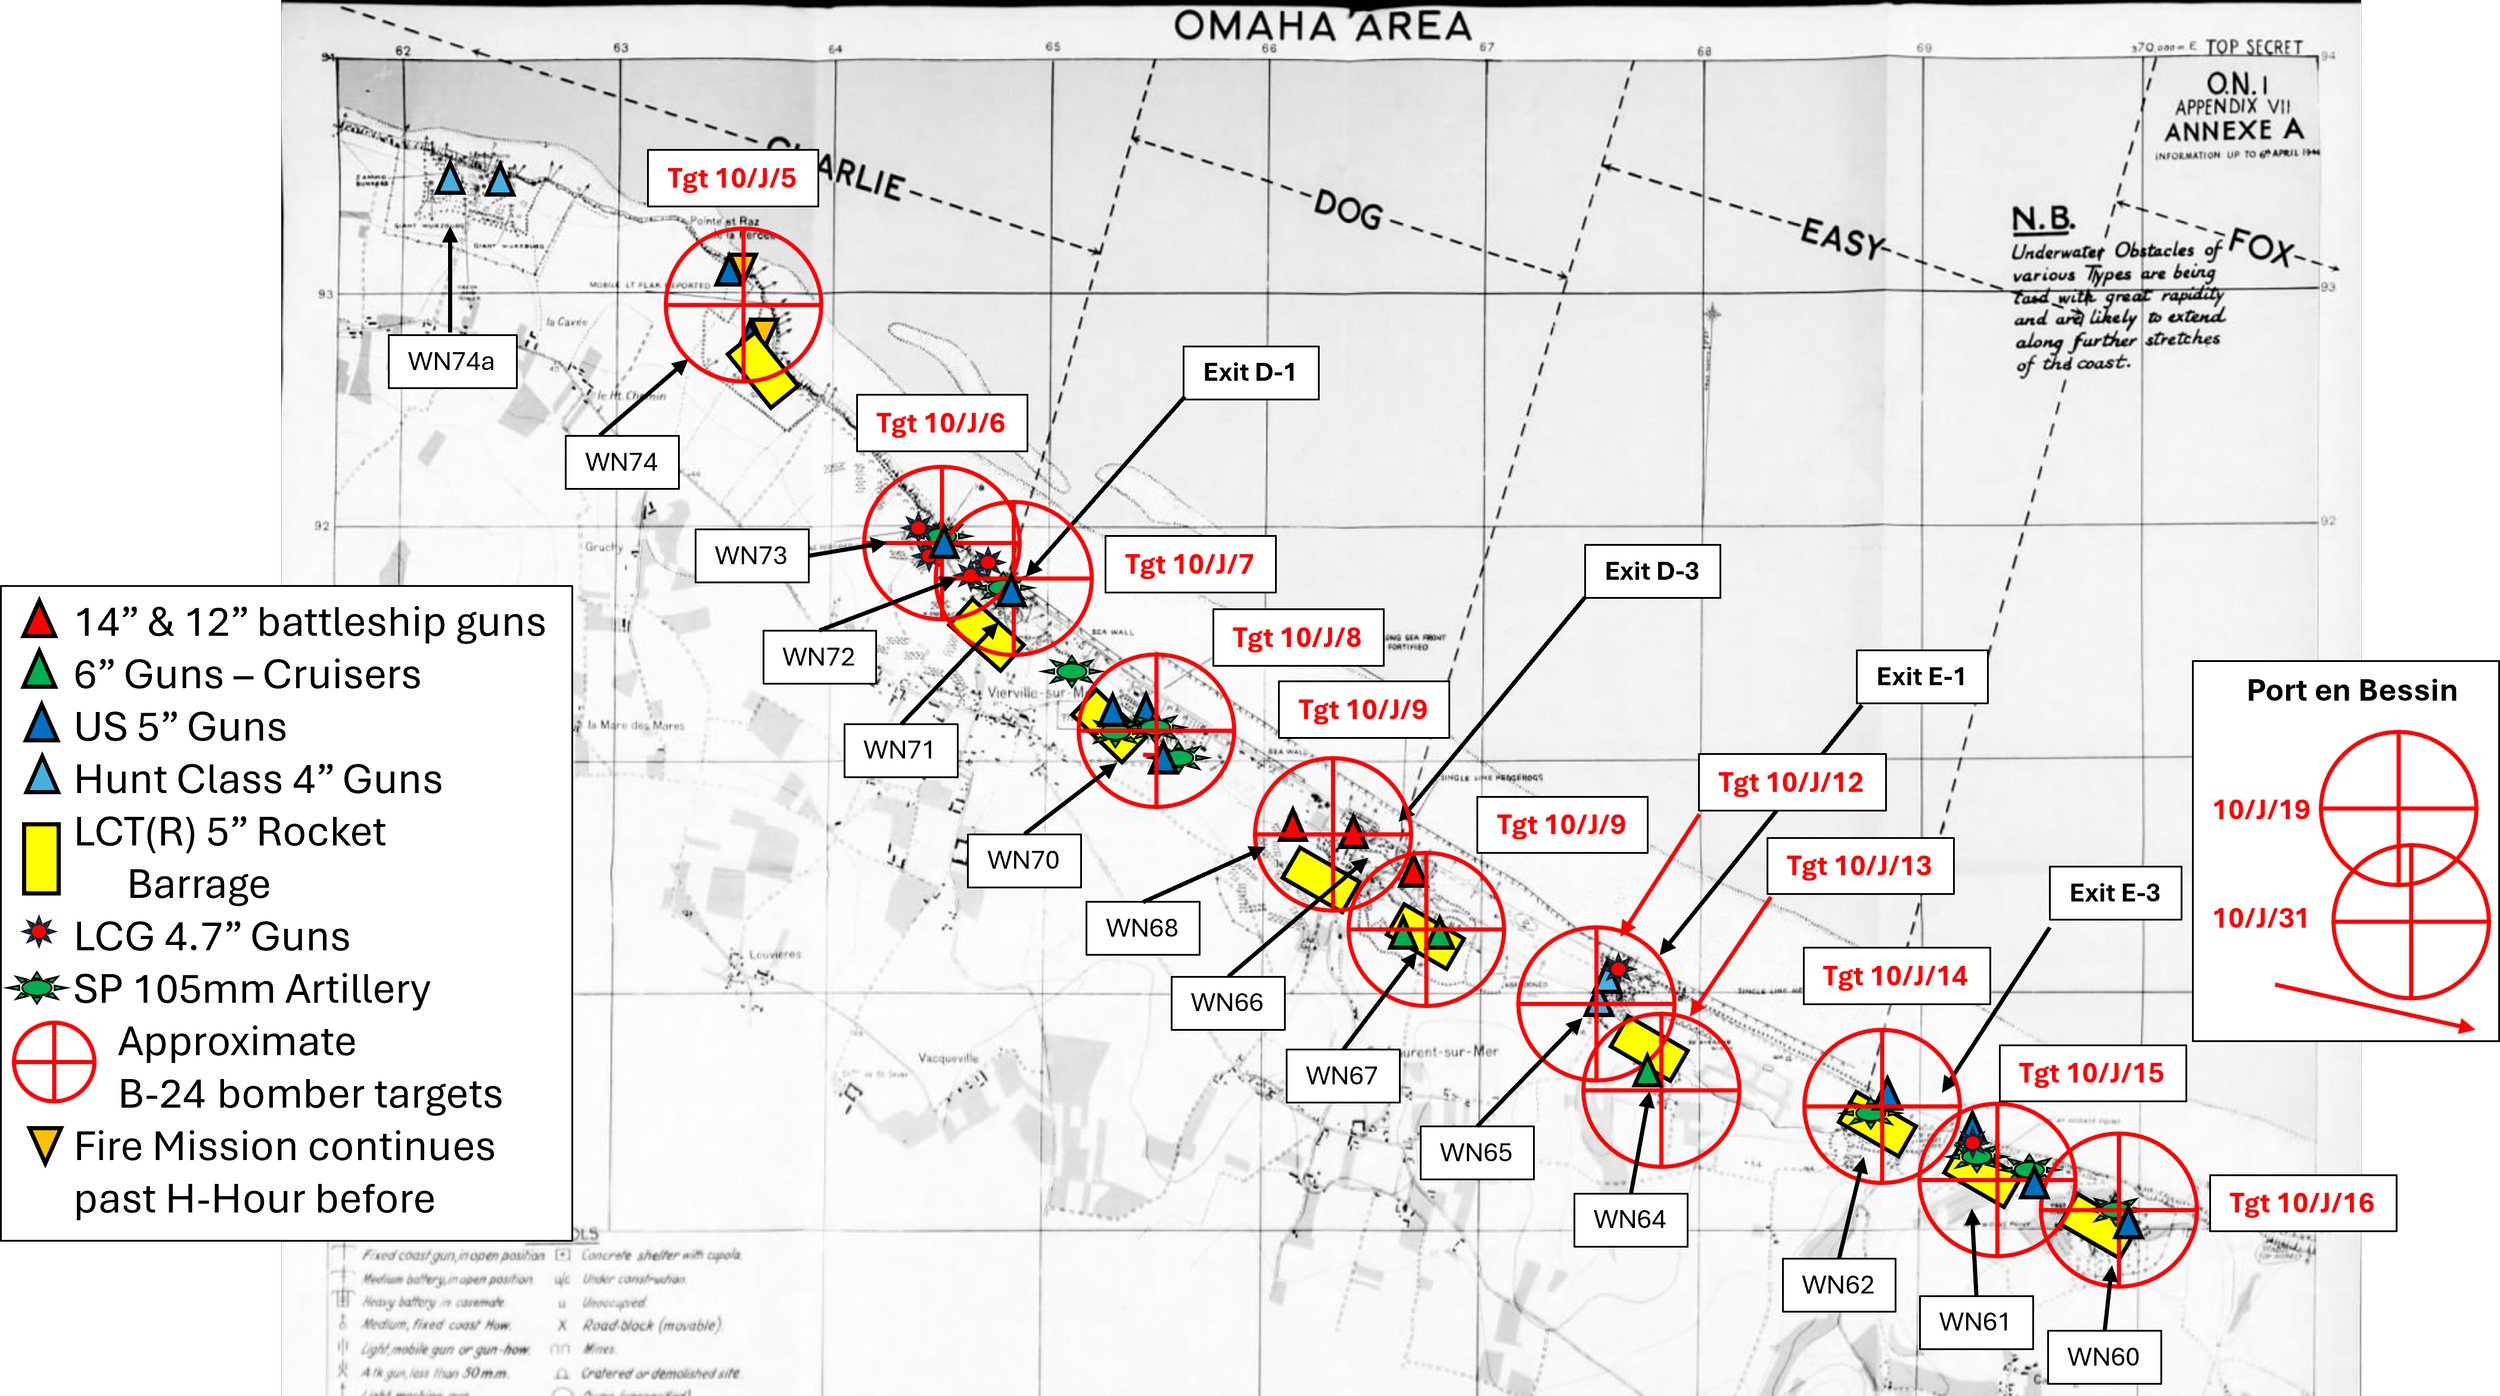
Figure 3. This Combined Bombardment Overlay show that the planned naval and air bombardment missions should have resulted in each resistance nest being hit by 3-5 separate types of strikes. Note that the B-24 graphics represent the enemy positions that were targeted, and do not reflect the actual aim points selected by the air planners.
Adding the bombloads specified in the 2nd Bombardment Division’s Field Order 328 [8], the air strikes on these 13 targets would deliver 1270 tons of bombs, which was about 100 tons more than the 1st Division and V Corps expected. [9] These, of course, were theoretical figures based on the number of aircraft scheduled for the mission. The topic of mission completion rates will be dealt with in some detail later, but for now it is sufficient to note that 450 B-24s were scheduled to be dispatched for these 13 targets.
To appreciate the relative (and theoretical) potential of these strikes, we’ll take the D-1 exit as an example. The air planners had defined two targets (10/J/6 and 10/J/7) to address this area, and together they encompassed German resistance nests WN71, WN72 and WN73. Thirty-six B-24s were scheduled to strike each of these two targets, with each of the bombers carrying 5,200 pounds of bombs, for a total of 187 tons. By comparison, planned naval gunfire on this same area, consisting of 550 rounds of 5-inch gunfire, totaled just over 15 tons. Even if the one LCT(R) barrage planned for that area were included, it would only add another 25 tons. So the air bombardment was clearly going to provide the vast bulk of the neutralization ‘punch’. At least theoretically.
As another example, the three resistance nests defending the D-3 exit (WN66, WN67 and WN68), were due to be shelled by 385 12-inch projectiles (70% HC and 30% AP) from the USS Arkansas and 400 rounds of 6-inch fire from HMS Glasgow. That amounted to about 50 tons of 12-inch projectiles and about 21 tons of 6-inch projectiles. By comparison, the two aerial targets covering the same enemy positions were also due to be hit by 187 tons of bombs.
So, yes, the weight of airpower scheduled to be released at Omaha should have provided the major contribution to the neutralization effort. But the picture is even more lopsided than this simple comparison of tonnage would indicate. The explosive filler in a general purpose (GP) bomb was about 50% of the bomb’s weight, and about 13% of a fragmentation bomb’s weight. By comparison, among the various naval projectiles, the burster charges never exceeded 15% and could be as low as 2-3% (the latter figure for 5-inch Common shells). Further, the explosives in the USAAF bombs were slightly more powerful than the explosives used in the naval shells.
This illustrates how truly powerful the planned bombardment would have been in comparison to the naval bombardment. In another environment, the two could have elegantly complemented each other, with the naval guns providing pinpoint hits on fortifications and the air bombardment providing the massive tonnage for general neutralization effects. But as we discussed at some length in previous installments, that simply was not possible. With the air and naval bombardments scheduled for the same brief window, there was neither time for precise naval gunnery nor would there be clear observation, as the dust and smoke would have obscured the target areas. Neutralization was all that could be expected and all that would be possible.
But as impressive as the above calculations are, the case is not as clear as it seems. The unstated assumption in those calculations was that all of the bombs would land in the target area. And that little assumption is not at all justified.
Bombs and Fuzes
One of the factors affecting bomb effectiveness is the selection of the most appropriate bombs—in terms of weight, type and fuze—for the target area. For Neptune, this question was first taken up by the Allied Expeditionary Air Force’s (AEAF) Weapons Committee. [10] Several experimental bombing missions were conducted culminating in Exercise Bunsen (26 April 1944). The general conclusion was that the best ordnance would be 100-pound fragmentation and 100-pound general purpose bombs (GP). [11] By the time D-Day approached, this had been further refined. The 2nd Bombardment Division loaded its B-24s with one of three standard bomb sets: 12 x 500-pound bombs (19 squadrons); 52 x 100-pound GP bombs (32 squadrons); or 52 x 100-pound fragmentation bombs (24 squadrons). [12] The 100 pound fragmentation bomb is something of a misnomer as it was actually a cluster of 6 x 20-pound fragmentation bomblets (totaling 312 bomblets per aircraft; for purists, the bomb tonnage summaries above might be adjusted higher by the 20 extra pounds of these bombs).
Figure 4. Drawings of the AN/M1A series 100-pound fragmentation bomb showing how six 20-pound fragmentation bomblets were bundled together into a ‘single’ piece of ordnance.
One modern historian dismissed these 20-pound bomblets as essentially useless, claiming the explosive filler was so small that a man standing exposed 15 feet away stood a good chance escaping unscathed. This is incorrect. The AN-M-41 series 20-pound bomb actually had virtually the same amount of explosive filler as the naval 5-inch Common shell that was the mainstay of the naval bombardment (2.6 pounds vs 2.58 pounds). Not only that, but the fragmentation sleeve of the bomb used segmented wire to produce a pattern of bullet-sized fragments, far superior to the random large chunks of metal the Common shell produced. The 100-pound fragmentation bomb was a lethal munition against exposed troops. But the chances of German defenders being outside of their reinforced concrete personnel shelters during the bombardment were highly remote. At best these bomblets might inflict superficial damage on non-essential equipment and fieldworks and a few of the guns in open top positions. So why choose to arm a third of the bomber squadrons with such a ‘light’ bombload when the target was a largely fortified position?
Consider that a single B-24 carrying fifty-two 100-pound fragmentation bombs, would deliver 312 bomblets, with the equivalent explosive force of the same number of 5-inch naval projectiles. This in turn was the equivalent bombardment ammunition allotment for one of Hall’s 5-inch destroyers (typically 300 rounds of 5-inch ammunition). But where the Navy typically had a single destroyer allotted to a target, the air plan allotted 18 B-24s with that bomb load to the same target (5,516 bomblets).
German defenders at Omaha later stated they were stunned (admittedly not stunned enough!) by the intensity of a single destroyer firing 300 5-inch projectiles (and almost all the destroyers fired far fewer), noting that it was a worse bombardment than they had experienced even on the Eastern Front. One can only imagine the physical and emotional impact had the resistance nest been bombarded by the planned 5,616 20-pound bomblets, each the equivalent of a 5-inch naval projectile.
With the bomb types determined, there followed considerable discussion and some testing focusing on the appropriate fuzing for the beach bombardment missions. Many versions state the decision was made for all bombs to have instantaneous fuzing. That wasn’t the initial plan. The 2nd Bombardment Division’s fuzing varied among the bomb sets. All of the fragmentation bombs were fuzed to detonate instantly on contact, as were three quarters of the 100-pound GP bombs. The rest of the 100-pound GP bombs and all of the 500-pound bombs were fuzed to detonate after a very slight delay, either 1/10 or 1/100 of a second. [13]
In retrospect, the choice of instantaneously fuzed 100-pound GP bombs might be open to question. The intent apparently was to minimize cratering on the beach, which according to AAF histories was a driving concern for the ground commanders (I have yet to find any written record by the ground commanders voicing this concern, but it may be that I just haven’t found it yet). The Ninth Air Force’s Operational Research Section determined a delayed fuze of 0.01 seconds produced a crater twice as wide and twice as deep as an instantaneously fuzed 100-pound GP bomb (18 x 5 ft versus 9 x 2.5 feet).[14] So, the choice of instantaneous fuzing would serve the desire to minimize cratering. The problem is that instantaneous fuzes would greatly reduce effectiveness in neutralizing the defenders. A later analysis of combat operations indicated a delay of as little as 0.025 seconds substantially increased the damage and blast effects on surrounding features (ranging from three to six times as much damage). Further, interrogations of enemy POWs revealed that “morale was less affected by the blast and fragmentation of instantaneous fuzing than by the cratering and damage of delay fuzing.”[15] Since the study that contained those conclusions was not published until after VE Day, we can’t fault the Neptune planners for their fuze selection . . . but we can fault the AAF in general for waiting so long to study this matter.
The best fuze/bomb combinations—from the perspective of neutralizing the defenders—appears to have been the 100- and 500-pound bombs with delay options of 0.1 and 0.01 seconds. The 2nd Bombardment Division planners employed the 0.1-0.01 delay fuzes on the bomb sets of a third of the strike force (27 of 75 squadrons). These squadrons were not distributed evenly across the beach defenses, however, with only 5 of the 13 targets scheduled for them. Three of those targets were at the extreme ends of the beach where no troops were scheduled to land (WN74 and the two Port en Bessin targets) and where craters would not hinder movement off the beach.
The last two targets to receive delay fuzed bombs seem to have been carefully selected as well. One was WN70 (Hamel au Prêtre), where there was no beach exit, and therefore cratering would not be so much of a problem. The second was WN60 (covering the F-1 Draw), which was not considered a priority exit for development. Ironically, it turned out to be one of the earliest exits that could be cleared on 6 June.
In the last few hours before takeoff, however, the fuzing guidance would be thoroughly confused.
Groping in the Dark and Squinting into the Dawn
With the framework of the air bombardment plan established, it was time for the Eighth Air Force to figure how to fly the missions. As a command built and honed to execute the strategic bombing campaign, it needed to learn some new skills, and needed to learn them quickly.
One challenge was how to launch the more than 1,300 bombers of the Eighth Air Force and assemble them into squadrons and groups . . . and do it at night. They needed to do this at the same time the RAF and the Ninth Air Force were similarly assembling their strike groups. The skies of England would be very crowded. This would be one of the most challenging tasks in an invasion that faced many difficult challenges. To address this problem, the Eighth Air Force developed an intricate combination of searchlight beacons, radio beacons, colored recognition flares and a host of other techniques. Most of these were not new, but they were new for the Eighth and they would have to master them in a very short time, on an unprecedented scale and get it right on the first operation.
Figure 5. This diagram illustrates the complexity of assembling the Eighth Air Force’s three divisions in overcast weather. It is similar to the procedures used on 6 June as the divisions took off and assembled during the hours of darkness. The task was complicated by most of the airfield also having a heavy overcast at the time.
On the first of May 1944, the Eighth Air Force conducted a rehearsal of these procedures as part of an actual mission, involving 189 bombers from each of the three bombardment divisions. The rehearsal proved the procedures were a workable solution. Another objective of this test was to compare the effectiveness of different squadron sizes, with six and nine aircraft formations under consideration. The resulting decision was to adopt a six-aircraft squadron (two elements of three aircraft, each in a Vee formation).[16] The standard squadron formation in the Eighth Air Force at the time was twelve aircraft in four elements of three, so the D-Day formations would be half the normal size, apparently for ease of control and maneuverability under limited visibility. Despite the reduction in size, the squadron formation width remained the standard 390 feet, dictated by the 110-foot wingspan of the B-24.
Another change involved the ‘box’. Eighth Air Force bomber formation doctrine evolved during the war, with twelve different formations used at one time or another. In 1944, a typical bombardment group flew in a formation made up of three squadrons (each of 12 aircraft). One squadron flew in the lead position, a second flew in the high position (and offset to the left) and the last flew in the low position (offset to the right), and the entire formation was considered the box. If flown properly, it provided a compact group with maximum fields of fire for the bombers’ massed .50 caliber machine guns. It was considered the best defense against German interceptors. The bombers would fly in this formation until shortly before the final bomb run, when the squadrons would fan out and attack one squadron at a time, in sequence. Each squadron would release their bombs when the lead aircraft’s bombardier released his load.
But on D-Day, the 2nd Bombardment Division would not fly in the standard box formation. Part of the reason for this was that German fighters were not expected to be out in force above the English Channel, and a strong force of Allied fighters would be flying cover. As noted above, the new squadron formation included half the number of bombers, with the three-squadron group similarly halved in number of aircraft. Two compensate for this, two groups were allotted to each target, ensuring the same bomb delivery as the standard group formation would have provided.
Exactly how these squadrons would have flown, and in what sort of group formation is a disputed point. We’ll come back to that in a moment.
Yet another challenge was the question of H-Hour. The precise time had not yet been established, but it was clear it would be early in the morning, which was hardly an optimal time for heavy day bombers trained for strategic missions. The US Eighth and Ninth Air Forces and the RAF’s 2nd Tactical Air Force participated in Exercise Batseye designed to explore visibility issues during very early morning hours. The results of these missions were one of many factors that contributed to the eventual selection of H-Hour. [17]
There is an interesting ‘what if’ here. The original date for the invasion was 5 June, before the weather caused a 24-hour delay. H-Hour at Omaha for 5 June was a half hour earlier than on June 6: 0600 hours, or just two minutes after sunrise. That would require the air bombardment to start at 0530 hours, which was just 14 minutes after first light. It’s interesting to speculate how well the heavy bombers would have been able to pick out their aimpoints in the faint light of the early dawn, but apparently the earlier experiments had satisfied the planers and commanders that the conditions would be acceptable.
With the foregoing tests conducted and decisions made, the Eighth Air Force had to train its crews how to conduct close-in tactical bombing in conjunction with the operation of ground forces. This was difficult. The Eighth was busy conducting a full schedule of pre-invasion preparation missions, and weather often interfered when time for training was available. The AAF summarized the effort with these words:
“In spite of these demands–and the weather–some training was carried out, although it fell far short of the minimum desirable for such a drastic change in employment.” [18]
Nevertheless, it would have to do.
Precision Bombing
"You keep using that word. I do not think it means what you think it means." Inigo Montoya
In April 1945, the Army Air Force Statistical Control Division published a study on bombing accuracy based on data drawn from stateside training and overseas combat operations. The third paragraph of the study stated:
“Bombing accuracy admits no precise definition but it is possible to choose some measure of the concept. However, the measurement of bombing accuracy may be accomplished in various ways and statistics purporting to describe bombing accuracy are liable to misleading or false interpretation unless the bases for determination of such-statistics are kept clearly in mind.”[19]
The study proceeded to prove just that in the following one hundred pages. The principal accomplishment of bombing accuracy measurements could be to create a false sense of statistical reassurance about a topic which was subject to innumerable variables, imprecise data measurement, and varying factors that could be added or discarded at the analyst’s whim. It was an effort to tame the untamable, quantify the unquantifiable and predict the unpredictable.
One method of trying to determine accuracy was to count the bomb craters after a strike and determine how many of the craters fell within certain distances of the aim point. Typically, for heavy bombers, 1,000 feet was the critical distance. It was obviously difficult to count bomb craters as a crater formed at one moment was likely to be obliterated by another bomb a moment later, and the post-strike photo might only show the last formed. As a result, analysts might only identify 50 craters out of 100 bombs dropped, in which case they assumed the rest of the bombs had landed within the visible pattern, but their craters had been obscured. This assumption failed to account for short or long releases that landed beyond the edges of the post-strike photo. Further, if the target had been struck before, it was often impossible to differentiate between today’s craters or those of two weeks earlier. Nevertheless, this method seems to have been preferred and used as the metric within the Eighth Air Force’s Operational Research Section, which conducted post-strike analysis.
Perhaps the least inexact methods to determine accuracy focused on the Mean Point of Impact (MPI) for a strike formation’s bomb pattern, and measured how far the MPI varied from the aim point. This method suffered from some of the drawbacks of the crater-counting method, and because it might not incorporate circular error probabilities, it might not measure dispersion. Still, it was generally used by the USAAF’s statisticians conducting stateside accuracy analyses. MPIs within 1,000 feet of the aim point were considered good; greater than that, poor. Due to the many variables involved, analytical assumptions, and inclusion or exclusion of factors, the results of these analyses varied widely. For example, applying three different methods to results of the same Eighth Air Force missions (September-October 1944), the study determined those same strikes resulted in either 48.5%, 37.6% or 23.6% of the MPIs falling within 1,000 feet of their aim points. The difference was a matter of analytical focus, with the largest percentage resulting from an analysis focusing solely on the technical aspects of aiming, while the smallest percentage included the effects of more operational realities. For instance, a bomb pattern with an MPI larger than 3,000 feet was discarded from consideration for the first method, as it was assumed to be a piloting or target identification error, not an aiming error.
The study noted that the third method, resulting in a 23.6% rate, was ”certainly more realistic as an index of bombing effectiveness attained.”[20] The 2nd Bombardment Division reported its own accuracy rates as 34% in May 1944, and 32% in June, but these calculations appeared to have excluded the ‘gross error’ category of data (cases in which the MPIs exceed distances in excess of 3,000 feet) and were based on the crater-counting method.
But in fact, even the lowest figure (23.6%) was overly optimistic, as it merely measured the mean point of impact for the bomb pattern and not the dimensions of that pattern. An MPI could fall within 1,000 feet of the aim point (a successful strike), but the majority of its bombs could still fall outside of the 1,000 foot circle.
Figure 6 shows the 2nd Bombardment Division’s accuracy rates for two periods leading up to D-Day, as measured by the Eighth Air Force’s analysts, and using the crater-counting method.
Figure 6. This chart shows the accuracy figures for the 2nd Bombardment Division for two overlapping periods leading up to D-Day (November 1943 - February 1944, and January - March 1944) as calculated the the Eighth Air Force Operational Research Section. [Source: 2nd Air Division Statistical Summary of Operations. The 2nd Bombardment Division was renamed Air Division in the Winter of ‘44-45.]
Despite their inherent flaws, the crater-counting and MPI methods were probably as good of metrics as any for a commander to evaluate unit accuracy; they were not, however, at all adequate for determining either targeting or safety measures for close tactical support. But it was all the planners had to go on for D-Day.
Ineffective Sortie Rates
Before applying these factors to the Omaha air bombardment plan, there is another category that needs to be considered. Almost every mission included aircraft that took off but failed to complete an ‘effective sortie’. These failures were generally attributed to one of four causes: weather; mechanical; personnel; or ‘other’. The monthly percentage of ineffective sorties for the 2nd Bombardment Division varied wildly, from a high of 63% to a low of 7%, mostly due to seasonal weather. Planners would have to take this sortie-attrition rate into account when determining how many aircraft to include in the D-Day missions. According to the 2nd Bombardment Division’s Statistical Summary of Operations, in the four months of January through May 1944 (the data the air planners would have to work with), the average ineffective sortie rate for the 2nd Bombardment Division was 37.25%.
The Friction of (Air) War
Having identified these factors which routinely sapped the power of a strike package, let’s return to the D-1 exit defenses to see their cumulative impact. Seventy-two B-24’s carrying 187 tons of bombs were slated for the two air targets which encompassed WN71, WN72 and WN73. Assuming 37.25% of those aircraft would fail to make an effective sortie, the air planners could count on only 45 aircraft reaching the target, and they would be carrying correspondingly fewer bombs: only 117 tons. Applying the 26.3% MPI figure identified above, only roughly 31 tons of those bombs would be expected to be in patterns with an MPI under 1,000 feet (and the actual number of bombs striking within 1000 feet being even lower).
And that illustrates the cruel mathematics of aerial bombing. Plans called for 187 tons of bombs to be carried by the 72 aircraft dispatched against these two targets, yet experience predicted only one sixth of that amount was likely to strike home. Suddenly, the 15 tons of 5-inch naval projectiles and 25 tons of naval 5-inch rockets which were scheduled for those same enemy positions no longer seem so paltry. To be fair, however, the naval bombardment would be subject to its own attritional factors—some of which were completely unexpected—but the point remains valid that the reasonably expected bomb tonnage would not outstrip that of the naval bombardment by nearly as much as expected.
Formations, Bomb Patterns and Target Geometry
As noted earlier, each squadron of six aircraft would fly in a formation of two elements of three aircraft, each element in a Vee formation, with the second element tucked in closely behind the first. This was a significant change from the usual squadron formation in which four elements of three aircraft made up the squadron.
Figure 7. This diagram illustrates the standard bombing formation in the Eighth Air Force during 1944. For D-Day the decision had been made to reduce the squadrons from 12 aircraft (as shown here) to just six, thereby reducing the group formation to 18 aircraft. As a further change, the individual squadrons would fly in column rather than fly in a three-squadron box as depicted above. [Source: Eighth Air Force Tactical Development, August 1942 - May 1945]
Beyond this one detail, there is a good deal of disagreement in some official accounts concerning the actual formations flown during the bombing run on D-Day. Sunday Punch at Normandy, part of the post-war USAAF Wings at War series, confusingly stated:
“Squadrons were to fly six abreast and bomb on the release of a Pathfinder aircraft in one of the center squadrons.“[21]
Did that mean six squadrons were supposed to fly abreast of each other? Or the squadrons were supposed to fly with six aircraft abreast? Similarly confusing language was used in at least one Eighth Air Force document:
‘”This was the technique used on D-Day. Eighteen to thirty-six aircraft were flown abreast with the H2X aircraft in the center of the formation.” [22]
This confusion is odd as the 2nd Bombardment Division’s F.O. 328 was clear on the matter. It stated:
“3. Flights of each CBW to depart respective “B” points in column at maximum interval of one minute and disposed within given altitude bracket. One PFF A/C (H2X) will be dispatched to lead each third flight of all CBWs.”
[Note: A bit of translation from ‘air slang’ to English is in order here. ‘Flight’ was used interchangably with ‘squadron’. ‘CBW’ is short for Combat Bombardment Wing (the intermediate headquarters between the bombardment division (higher) and bomb group (lower). A “B” point was a navigational checkpoint used for formation assembly after take off. ‘PFF’ was short for pathfinder. ‘A/C’ was short for aircraft. And ‘H2X’ was a radar navigation system used in poor visibility.]
Aircrew memories and mission documents support the text of the field order. This is confirmed by an exchange of letters between Charles Armstrong and Harold Morrison—the lead and deputy-lead pilots of the 44th Bomb Group—which noted their group flew in six flights (squadrons) of six aircraft each, with the squadrons following in a line behind. A formation sketch confirms this order.
The quote above from F.O. 328 alludes to altitudes. That order specified bombing altitudes ranging from 14,000 to 17,000 feet, depending on group.
The tactic of squadrons flying in column with a one minute interval offers some good advantages. It is far easier to maneuver a formation of six aircraft than one of 18 or 36 aircraft, and it greatly simplifies the matter of airspace management when you had 11 columns of aircraft flying in parallel across the same 5.5 miles of coastline(the distance between WN60 and Wn74); a group formation was about 1560 feet wide, but a six aircraft squadron formation was just 390 feet. And even with a one minute interval (about 2-3 miles distance at their airspeed), all six squadrons should be able to drop their bombs in 5-6 minutes.
A single squadron’s width was not sufficient to produce a bomb pattern that could entirely cover the dimensions of a typical resistance nest’s layout (3-400 yards wide), but with six squadrons separately bombing, the natural lateral dispersion between formations should provide adequate cumulative coverage.
The major drawback to this formation would be if the weather necessitated bombing though the clouds. Although we’ll discuss the H2X radar used for ‘blind’ bombing in the next installment, it’s important to note here that there were only enough H2X-equipped pathfinder aircraft (PFF) to lead one out of every three squadrons. In a normal bombing formation, only the lead bombardier in each box would perform the aiming duties, and all the aircraft in that formation would release their bombs when they saw the lead aircraft’s bombs drop. Which worked well if visibility were good.
But bombing though overcast presented a major problem. In the six-squadrons-in-column formation, only the first and fourth squadrons had an PFF-H2X to help with aiming. The second, third, fifth and sixth squadrons could not release their bombs at the same times as either of the PFF-H2X led squadrons as these four trailing squadrons would still be miles offshore. So how were the other four squadrons to judge when to drop? Anticipating this problem, the 2nd Bombardment Division’s Field Order 328 included these instructions:
“(8) In the event low clouds obscure the target area and coastline PFF bombing will be employed. Flights without PFF ships will drop on smoke flares of the preceding flight taking care not to drop short of them.”
The interval between squadrons was also reduced to 30 seconds or less.
To further prevent confusion, only PFF aircraft were allowed to have smoke flares on board. The normal winds at that time were onshore, so even if the smoke flares were affected by the the winds, it would only increase the safety margin for the assault craft. Those measures should provide some degree of assurance. Still, it wouldn’t exactly be what you’d call precision bombing.
Timing
The window allocated for the air bombardment of the beach defenses was a mere 15-25 minutes at Omaha. That may not seem like a problem, but given the thousands of bombers involved, launching from dozens of separate airfields, it posed a huge coordination challenge. That challenge was multiplied by the difficulty of taking off and assembling at night, a long, confusing and dangerous procedure. In fact, many squadron spent more time climbing to altitude and trying to assemble, than the short trip across the Channel to bomb would take.
To help bring order from this chaos, the Eighth Air Force had developed proven procedures for providing fliers with detailed schedules of check points and timings to synchronize the deployment of its groups. Those checklists were calculated to have the bombers meet a desired ‘Time Over Target’ of 0600 hours. That king of precise timing was not possible, so bombing windows were also prescribed. The 2nd Bombardment Division’s attack windows for each of its targets were dictated in its F.O. 328. The following passage from F.O. 328, issued at 1525 hours on 5 June (just 15 hours before H-Hour), specified the bombing times.
“C. Bombing.
“(3) Time Control: Targets 10/J/19 and 10/J/21 (96CBW) will be attacked from Zero Minus 30 to Zero Minus 5 will be attacked from Zero Minus 20 to Zero Minus 5. All other primaries will be attacked from Zero Minus 30 to Zero Minus 5. Absolute deadline for any bombing on primaries is Zero Minus 2. Flights arriving after Zero Minus 2 will bomb Secondary or Last Resort.”
Targets 10/J/19 and 10/J/21 were the two targets covering Port en Bessin. It isn’t clear why those two target only had a 15 minute window, but it may have been because fewer squadrons were due to attack them.
That quote will prove to be key in the next installment, so I want to emphasize it. The official AAF versions of the Omaha air bombardment stressed that the Eighth Air Force consistently warned the ground commanders that there needed to be enough time between the last bombs and the first wave of troops on the beach to avoid friendly fire from short drops. Supposedly the safety distance compromise reached between the air and ground commanders was 1,000 yards (which still posed some ‘acceptable’ risk). That 1,000 yards supposedly translated to the bombing needing to stop by 0625 hours (H-5) at the latest.[23] The AAF version also holds that even this was not deemed enough, and that they unilaterally moved the cutoff time five minutes earlier to 0620 hours, (but that was not contained in any order). Yet we clearly see here the 2nd Bombardment Division, which would fly the Omaha missions, instructed its bombers that the cutoff was just 2 minutes before H-Hour. Which was eight minutes after the first DD tanks should wade ashore. As this order was issued just 15 hours before H-Hour, it’s clear something does not quite add up in the AAF versions of events. The matter of the bomb cutoff time and the Eighth Air Force’s efforts to fix it will figure largely in the next installment.
The Beach Cratering Problem – Again
At this point, our discussion leaves the realm of statistics, technical consideration and tactics, and begins to enter the realm of operational constraints. Given the unfortunate result of the bombing on D-Day, USAAF sources have been extremely vague, if not outright evasive, in documenting what happened, when it happened and who was responsible.
As an example, according to one source, Doolittle himself supposedly issued instructions to the air planners that he wanted no bombs to land on the beaches, again supposedly due to the idea that the ground commanders wanted no craters seaward of the high tide line. As a result, Doolittle created a no-bomb line at the high tide line. Supporting this assertion, his FO 727 warned that no bombs were to be dropped north of the bomb line. That no-bomb line would have coincided with the seawall and shingle embankment, and would be just a few yards away from the forward boundaries of the resistance nests along the landing beaches.
The problem is that short bomb releases were not uncommon occurrences. To ensure no bombs landed seaward of the no-bomb line, the aim points would have to be moved inland, and not just by 1,000 feet of the typical target circle, or even 2,000 feet. It’s likely it would have resulted in the aim point being moved 3,000 feet or more, virtually guaranteeing the MPIs would have been so far inland as to miss the resistances nests. This decision alone, if true and if implemented, would have largely negated the effectiveness of the air bombardment, even if the visibility on D-Day were excellent.
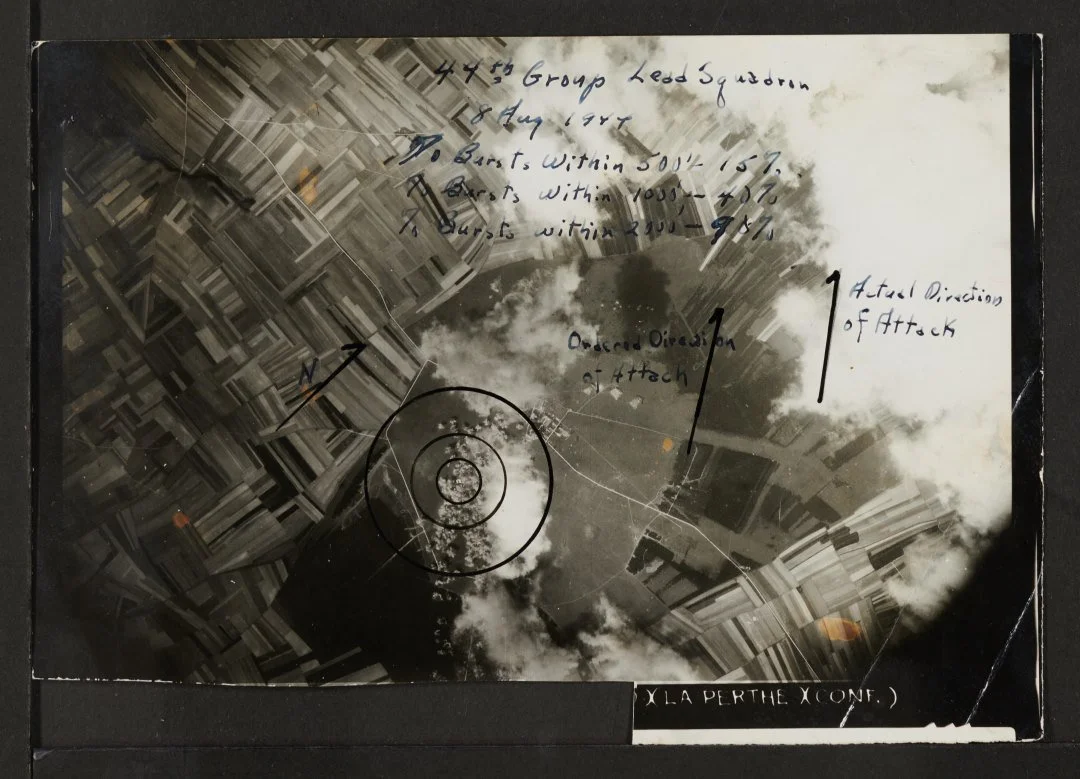
Figure 8. A strike photo taken from a 44th Bomb Group (14th Combat Wing, 2nd Bombardment Division) mission in August 1944. Despite fairly good visibility, a string of short bombs begins 4,000 feet from the aim point. With 40% of the bombs supposedly landing within 1,000 feet of the aimpoint, this was still considered a highly accurate drop, despite the short bombs. These short releases were exactly what the air planners had to worry about.
Worse, to my knowledge, none of the surviving documents include grid coordinates for the actual D-Day aim points. The Eighth Air Force FO 727 included grid coordinates for each target. The 2nd Bombardment Division’s Field Order 328, which assigned targets to its subordinate wings and groups, designated the targets using only the alpha-numerical designations (e.g., 10/J/5 for the WN74 position). Each target also had a reference photo listed and a letter referring to a lettered target ‘goose-egg’ circle (e.g., Ill.52C - illustration 52, target C). No order included actual aimpoints. None of the post-strike mission analysis reports or bombardier reports I have seen list their aim points. They only refer to aimpoints as ‘as assigned’.
Lacking coordinates for the actual aimpoints as chosen by any of the air planning echelons, it’s impossible to determine where the 2nd Bombardment Division originally intended to drop its bombs, or if those aimpoints might have been moved by inland as a result Doolittle’s bomb line decision. And it isn’t at all certain the ground commanders would have wanted to forfeit all bombing effects on the defenses in order to obtain an un-cratered beach below the high tide line, if that change had even been made known to them.
As for the subsequent decisions that were also implemented to prevent short bombings, and the last-minute decision that was ordered to compensate for H2X margins of error in bad weather, those are even less well documented and far more controversial. And they will have to wait for the next Installment.
FOOTNOTES
[1] See Hall’s 1st endorsement (dtd 25 Sept 1944, pg 18) to Deputy Commander, Assault Force O-2’s Action Report – Operation Neptune, dtd 4 July 1944. NARA, RG 38, NARA Catalog Id: 4697018
[2] Some documents refer to this target as Ste. Pierre du Mont, which was the commune adjacent to the Pointe du Hoc battery position. See for example, Allied Expeditionary Air Force Report on Air Operations Prior to and in Support of Operation “Neptune”, pg 33, para. 188.
[3] Ibid.
[4] Located about 3 kilometers southwest of the Maisy I & II complex.
[5] Army Air Forces Historical Studies, No. 36, Ninth Air Force, April to November, 1944, USAAF Historical Office, October 1945. See pp.70 and 73 for identification of the actual targets and pg. 77 for strike results.
[6] Ibid, pg 69.
[7] According to the V Corps Fire Support Plan (pg. 2 of Annex 12, revised 19 May 1944), the final two air targets—N (a single strike) and O (a double strike)—were to hit in the vicinity of Port en Bessin (Army targets T27, T28, T30 and T22, T23, T24, respectively). This targeting was confirmed in the 1st Infantry Division’s order (Annex 6, pp 1-2, of Field order #35, dated 25 May 1944). However, Annex G (Air Plan) to Hall’s CTF 124 order (20 May 1944) did not list either the air target letters or Army target numbers for the final two air targets; instead, it listed two grid coordinates which plot to about seven kilometers west of Port en Bessin. Critically, those grids would place a single strike on WN61 and a double strike on WN60.
[8] 2nd Bombardment Division message, Subj: Field Order No. 328, with Annex 1, Execution Order, date/time group 05/1325B June 1944.
[9] Their plans called for 1286 tons to be “delivered just before H-Hour”, but that total included the expected 119 tons for four of the coastal artillery battery strikes; the tonnage the Army expected for just the beach targets was 1167 tons. So the beach defense theoretically would receive about 100 more tons than expected.
[10] The Allied Expeditionary Air Force was the SHAEF air component, controlling the air assets assigned to Neptune.
[11] Army Air Forces Historical Studies#70, Tactical Operations of the Eighth Air Force, 6 June 1944 - 8 May 1945, USAF Air University, 1952, pg 11.
[12] 2nd Bombardment Division F.O. 382, para 2, Targets and Bomb Loads.
[13] Ibid. The order’s instruction’s for the delay fuzing was worded as “1/10-1/100”, which was shorthand for the fuzing could either be a 0.1 second delay if a nose fuze was employed, or 0.01 second when a tail fuze was employed.
[14] AAF Evaluation Board in European Theater of Operations report, The Relative Effectiveness of Various Types of Bombs and Fuzes, Army Air Forces Evaluation Board, 1 June 1945, pg. 3.
[15] Ibid, pg. 62
[16] Wings at War Study No. 2: Sunday Punch at Normandy - The Tactical Use of Heavy Bombardment in the Normandy Invasion, HQs, Army Air Forces, 1945, pg. 16.
[17] AFHS #70, pg 12
[18] AFHS #70, pg 13
[19] USAAF, Office of Management Control, Statistical Control Division, Study ST-C-83, AAF Bombing accuracy: Continental – Overseas, April 1945, HQs Army Air Forces, 19 June 1945, pg. 10.
[20] Ibid, pp. 64-65.
[21]Sunday Punch, pg. 10.
[22]Eighth Air Force Tactical Development, August 1942 – May 1945, Eighth Air Force and Army Air Forces Evaluation Board, July 1945, pg 65.
[23] See for example AAFHS Study 70, pp.17-18, and Sunday Punch, pg. 10